DIY - G35 Sedan Compression Rod Replacement
#1
 05-05-2012, 10:46 PM


DIY - G35 Sedan Compression Rod Replacement
This is a post regarding the replacement of the G35 Sedan RWD Compression Rods. It is the entire compression rod, NOT the bushing. You CAN replace the bushing without the rod, but I couldn't find a single shop with a hydraulic press willing to do this, so I ended up buying the improved OEM compression rods and replacing them myself. There are a few small essential details that aren't mentioned in compression rod replacement so I felt obligated to write this. I'm doing my best to provide a step-by-step guide.
Model performed on - 2003 G35 Sedan, RWD, non-sport package (although I believe this is applicable to others.)
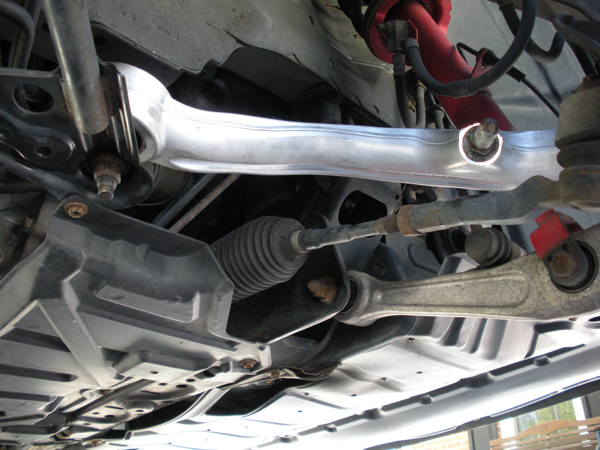
So, for starters, lift the car up, take the tires off, there can't be a load on the compression rod.
There is actually only 2 large bolts that hold the compression rod and 1 extra control arm that is attached that needs to be removed.
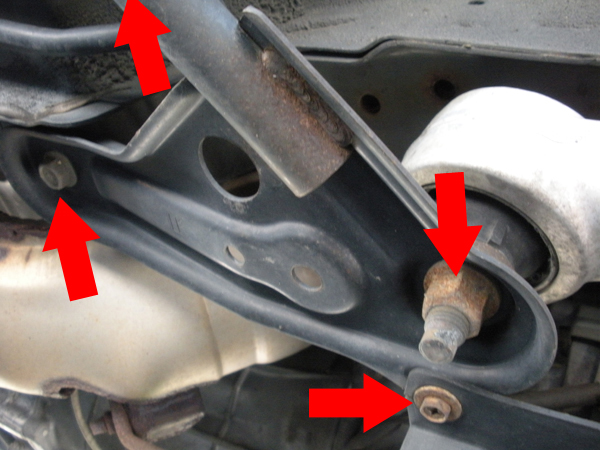
There's 3 separate screws for the control arm, and one that is shared with the compression rod. 2 of the separate screws are pictured, and at the top of the picture, follow that small 'pipe' to the last screw. It's pretty obvious. If I'm not mistaken, it's 2-14mm bolts and 1-10mm bolt. Then proceed with removing the bolt that is shared with the control arm and the compression rod (I can't recall the size), but this should allow for the removal of the control arm, and 1/2 of the compression rod.
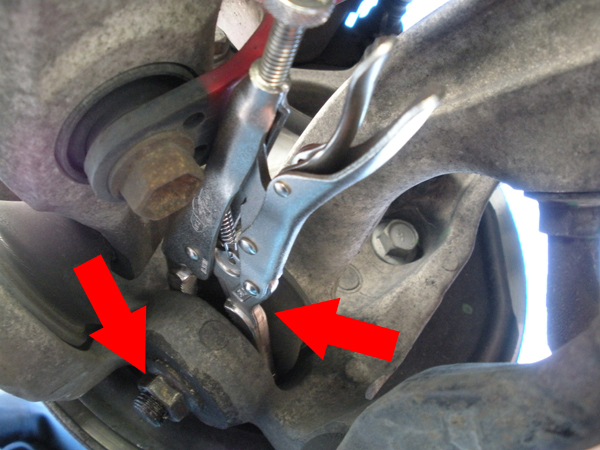
The other side is a little trickier. There is only 1 bolt holding the compression rod in, but it requires vice grips on the thread/bolt to allow the nut to be un-threaded. Carefully push the boot up a little bit so you can fit some vice grips on the thread tightly, clamp, and then begin to unscrew the nut below it. This should fully remove your compression rod now.
Note: Sometimes (I've heard) the boot rubber can warp, or melt, so it requires a little effort to fully remove the compression rod. I did have to use an impact hammer to loosen the compression rod completely after all the screws were removed, but nothing serious.

So now that the compression rod is out, there is a VERY important piece on the old compression rod that is not mentioned by almost every retailer selling compression rods. That tapered sleeve on the old compression rod (the cylinder looking fitting on the end of the compression rod on the right) needs to be removed and fit on the new compression rod in order for the bushing to fit correctly.
This part was INCREDIBLY hard for me to get off initially. If you are experiencing trouble removing it, you can order them from Nissan (Part # 40173-33P00). I would recommend buying them when you buy your compression rods because it's a lot easier than what I did... which was...
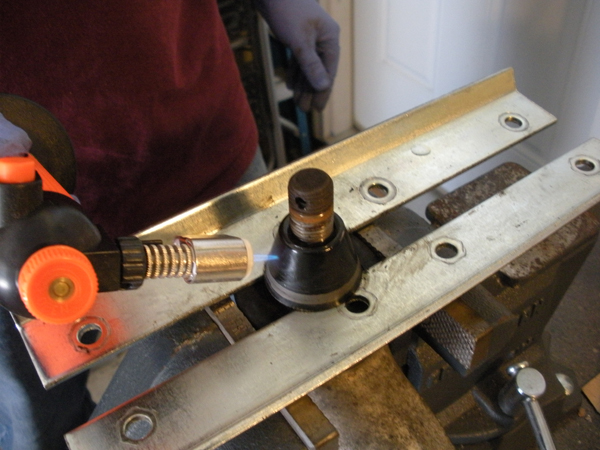
Heat that son of a bitch up and smash it off. It worked, but basically I had to fit it into a workbench table vice, push the boot down, fit 2 pieces of metal under the sleeve, heat it up for ~1-2 minutes with a butane torch, and use an impact hammer to force the thread down through the sleeve essentially. It was a pain, but it got the sleeve free. I would say, for $10, just order the sleeves at the same time you get your compression rods and save the trouble. (And crazy enough, no one ever mentioned this at all during compression rod replacement. It's pretty damn important.) Don't forget to take the stopper (that little nub that's threaded into the middle of the compression rod) and screw that into the new compression rod as well.
You can essentially follow those steps backwards for the installation of the new rod. The threads for the compression rod have to use the correct torque specs, which you can find here or in the G35 Service Manual. Make sure they are correct!
I haven't included all of the details of the process, but certainly the big ones. I couldn't find a compression rod DIY replacement that wasn't specific for the bushings, so I just wanted to help. Hope some of you guys out there find this useful.
Model performed on - 2003 G35 Sedan, RWD, non-sport package (although I believe this is applicable to others.)
So, for starters, lift the car up, take the tires off, there can't be a load on the compression rod.
There is actually only 2 large bolts that hold the compression rod and 1 extra control arm that is attached that needs to be removed.
There's 3 separate screws for the control arm, and one that is shared with the compression rod. 2 of the separate screws are pictured, and at the top of the picture, follow that small 'pipe' to the last screw. It's pretty obvious. If I'm not mistaken, it's 2-14mm bolts and 1-10mm bolt. Then proceed with removing the bolt that is shared with the control arm and the compression rod (I can't recall the size), but this should allow for the removal of the control arm, and 1/2 of the compression rod.
The other side is a little trickier. There is only 1 bolt holding the compression rod in, but it requires vice grips on the thread/bolt to allow the nut to be un-threaded. Carefully push the boot up a little bit so you can fit some vice grips on the thread tightly, clamp, and then begin to unscrew the nut below it. This should fully remove your compression rod now.
Note: Sometimes (I've heard) the boot rubber can warp, or melt, so it requires a little effort to fully remove the compression rod. I did have to use an impact hammer to loosen the compression rod completely after all the screws were removed, but nothing serious.
So now that the compression rod is out, there is a VERY important piece on the old compression rod that is not mentioned by almost every retailer selling compression rods. That tapered sleeve on the old compression rod (the cylinder looking fitting on the end of the compression rod on the right) needs to be removed and fit on the new compression rod in order for the bushing to fit correctly.
This part was INCREDIBLY hard for me to get off initially. If you are experiencing trouble removing it, you can order them from Nissan (Part # 40173-33P00). I would recommend buying them when you buy your compression rods because it's a lot easier than what I did... which was...
Heat that son of a bitch up and smash it off. It worked, but basically I had to fit it into a workbench table vice, push the boot down, fit 2 pieces of metal under the sleeve, heat it up for ~1-2 minutes with a butane torch, and use an impact hammer to force the thread down through the sleeve essentially. It was a pain, but it got the sleeve free. I would say, for $10, just order the sleeves at the same time you get your compression rods and save the trouble. (And crazy enough, no one ever mentioned this at all during compression rod replacement. It's pretty damn important.) Don't forget to take the stopper (that little nub that's threaded into the middle of the compression rod) and screw that into the new compression rod as well.
You can essentially follow those steps backwards for the installation of the new rod. The threads for the compression rod have to use the correct torque specs, which you can find here or in the G35 Service Manual. Make sure they are correct!
I haven't included all of the details of the process, but certainly the big ones. I couldn't find a compression rod DIY replacement that wasn't specific for the bushings, so I just wanted to help. Hope some of you guys out there find this useful.
Last edited by dankfresh; 05-05-2012 at 10:58 PM.


#5
05-27-2012, 03:46 PM

they probaly wanted to get paid for the WHOLE job and not just pressing in the bushing for $10-50.
This "new design", is it a new arm design or just a new bushing. Did the arms look exactly same minus the bushing part?
This "new design", is it a new arm design or just a new bushing. Did the arms look exactly same minus the bushing part?
#6
05-27-2012, 04:20 PM

#7
05-27-2012, 04:36 PM

Trending Topics
#8
05-27-2012, 04:39 PM
#9
08-04-2012, 12:35 PM

What is this spindle you are talking about. I am about to do this and can not find my vice grip.
#11
08-04-2012, 03:35 PM
Thank you.
@$#%@$ NAPA @$%&# up my day. I swapped the parts, with the helpful pictures and advice it was done quickly. I only realize they did not give me the cone shaped bushing that goes on the ball joint end when I am putting the last bolt in. Additionally, the old part was left in my buddy's truck which is now over 200 miles away.....
NAPA is closed and its a long weekend here in Canada so Tuesday Taxi to NAPA to pick that bushing up....ouch
#12
08-04-2012, 10:14 PM
#13
08-04-2012, 11:32 PM

If you need a bushing PM me the number I have a whole bag of bushings from when I did my compression rods and the spindels
Compression rods do actually affect ride quality and you suspension even though some people state no it absorbs some of the "hit if you will when going over a bump so you don't feel it in the drivers seat and when the bushing is no longer creeking and starting to thud that is because the arm is moving up and hitting the underbody most already know this and I know its not a discovery but there are many posts saying that when they go bad there is nothing that happens it helps increase the life of your struts and springs
Compression rods do actually affect ride quality and you suspension even though some people state no it absorbs some of the "hit if you will when going over a bump so you don't feel it in the drivers seat and when the bushing is no longer creeking and starting to thud that is because the arm is moving up and hitting the underbody most already know this and I know its not a discovery but there are many posts saying that when they go bad there is nothing that happens it helps increase the life of your struts and springs
#14
11-29-2012, 10:43 PM

I am trying to get mine off my car and hope you guys can help me out.
I unscrewed it all but that part of the picture doesn't seem to get off. I tried pushing it down and hammering it aswell. The rod i bought doesnt have the rubber in it and its just a big hole and wondering if i would be able to reuse it
I unscrewed it all but that part of the picture doesn't seem to get off. I tried pushing it down and hammering it aswell. The rod i bought doesnt have the rubber in it and its just a big hole and wondering if i would be able to reuse it
#15
12-06-2012, 12:14 PM
